ariadne — images as one continuous line
Redraws a photograph as a single closed loop that never crosses itself, after Robert Bosch, Opt Art, chapter 3 — TSP art.
The image is converted to a field of ink density, points are scattered in proportion to that density, the points are relaxed until they are evenly spaced for their local darkness, and then a travelling-salesman tour visits every point once and returns to its start. Darkness in the finished drawing is the density of the wandering line, not the darkness of any stroke.
ariadne -n 20000 -w 1.4 cameraman.png drawing.svg
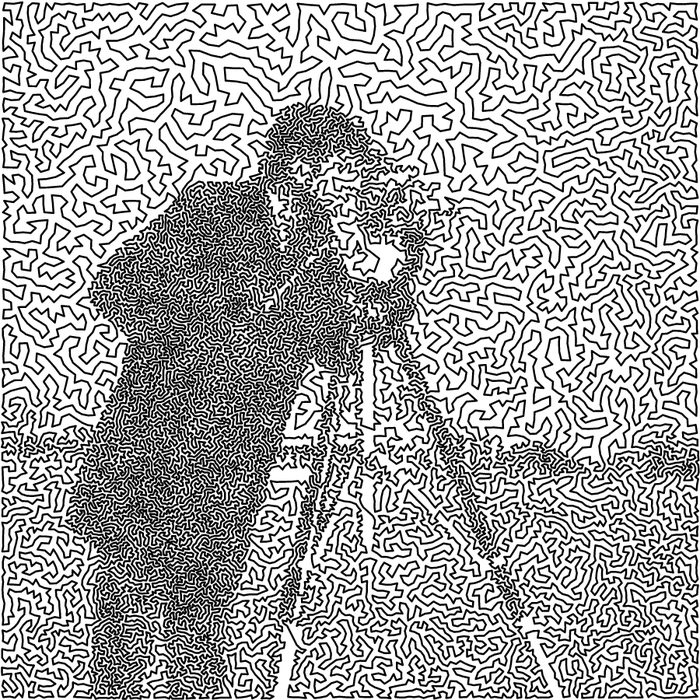
Its name is Ariadne’s thread — one unbroken line through the labyrinth.
The one thing to understand first
Point count decides whether the image resolves. Stroke width is uniform, so at low point counts the drawing is just a mesh with no tonal range. Around 20,000 points is where a 512×512 photograph becomes recognizable. 5,000 does not, and no other setting will rescue it:
ariadne -n 5000 -w 1.4 cameraman.png
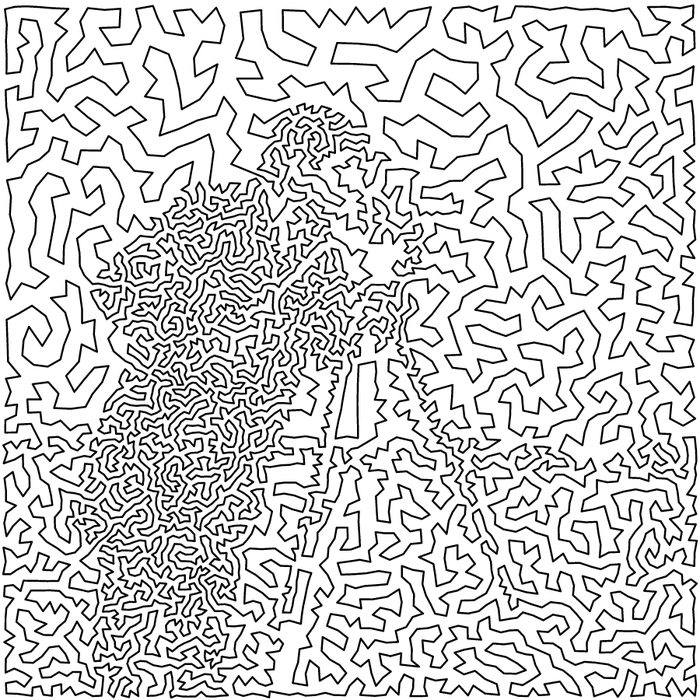
You can see the line wandering pleasantly and the cameraman failing to appear.
If your drawing looks like this, raise -n before changing anything else.
Usage
ariadne [OPTIONS] <INPUT> [OUTPUT]
<INPUT> is any PNG, JPEG, TIFF, or BMP. [OUTPUT] defaults to the input name
with an -ariadne.svg suffix; a PNG is written alongside it at the same
base name.
The SVG is a real vector path. It scales to any size without pixellating, and a pen plotter will draw it directly.
The pipeline
Each run reports timings per stage, so the vocabulary is worth having:
| Stage | Name | What happens |
|---|---|---|
| S0 | tone | Image → ink density field (sRGB-linearized luminance) |
| S1 | stipple | Density → points, drawn in proportion to ink |
| S2 | relax | MacQueen relaxation + Lloyd polish → blue noise |
| S3 | partition | Optionally split points into groups (--groups) |
| S4 | tour | Order each group into a tour |
| S5 | render | Write SVG and PNG |
Options
The essentials
| Option | Default | Meaning |
|---|---|---|
-n, --points <N> |
20000 | Number of stipple points |
-g, --gamma <G> |
2.0 | Density field gamma |
-w, --linewidth <W> |
0.5 | Stroke width, in image pixels |
-r, --resolution <PIXELS> |
1200 | Output width in pixels |
Line width interacts with resolution. The default 0.5 is tuned for the
default 1200-pixel output. Render larger without adjusting -w and the strokes
go sub-pixel and wash out to pale gray; render much smaller and they blot
together. As a rule of thumb, scale -w roughly with -r. Every example on
this page uses -w 1.4 at -r 900.
--gamma shapes the mapping from brightness to ink. Above 2.0 deepens the
shadows and empties the highlights; below 2.0 flattens toward mid-gray.
Shaping the density field
| Option | Default | Meaning |
|---|---|---|
--floor <F> |
0.0 | Snap density below this to exactly zero |
--unsharp-sigma <S> |
0.0 | Unsharp mask radius; 0 disables |
--unsharp-amount <A> |
0.0 | Unsharp mask strength |
--floor is how you get genuinely blank paper, and it is the most
under-appreciated option in the tool. With the default of 0.0 nothing is
floored, so light regions still receive a thin scatter of points and the line
meanders through what should be empty sky — filling the whole frame with even
texture and flattening the subject into it.
ariadne -n 20000 --floor 0.25 -w 1.4 cameraman.png
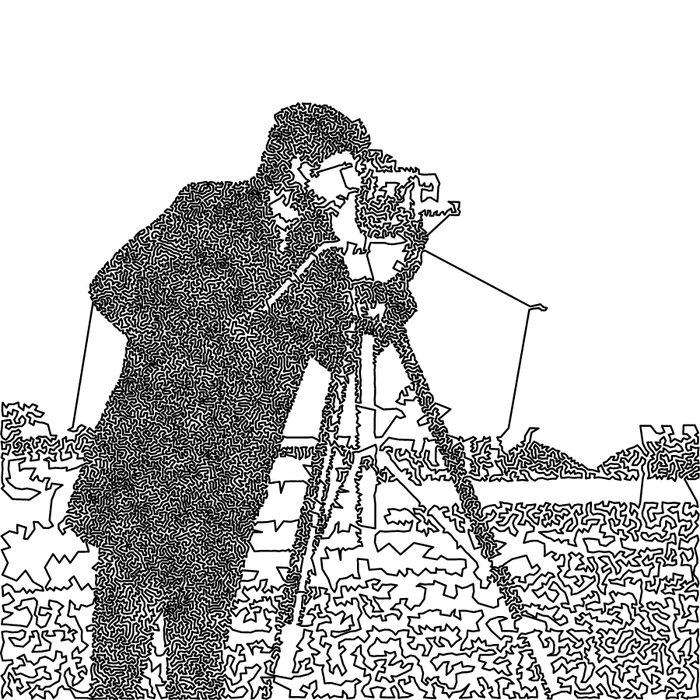
Compare that with the default render at the top of this page. The same 20,000 points, redistributed: the sky is now true white, and the points it would have wasted there have gone into the coat, the tripod, and the grass. The subject reads far more clearly.
How high to set it depends on the picture. Small values do very little on an
image whose light areas are already near-white — on cameraman, --floor 0.05
moves total ink by less than 0.1%, while 0.25 moves it by nearly a quarter.
Raise it until the background empties, and stop before it starts eating the
subject.
--unsharp-sigma and --unsharp-amount sharpen before stippling, which can
recover edge definition that the density mapping softens. Both must be non-zero
to have any effect.
Relaxation
| Option | Default | Meaning |
|---|---|---|
-e, --epochs <N> |
60 | Relaxation epochs |
--polish <N> |
2 | Lloyd polish iterations |
--schedule <S> |
power |
Learning rate: power, harmonic, or constant |
Relaxation is what converts a random scatter (white noise) into an evenly spaced
one (blue noise), and it is most of what makes the drawing look deliberate
rather than accidental. The defaults are sound; raising -e past 60 yields
progressively less.
The run reports cv_nn, the coefficient of variation of nearest-neighbor
distances. Lower means more evenly spaced. Values around 0.44 are typical of a
well-relaxed field.
Tour construction
--solver <S> (default tsp)
tsp— near-optimal and crossing-free. Produces roughly 23% shorter tours.hilbert— orders points along a space-filling curve. Faster, and reproduces output from before the TSP solver existed.
tsp is the better drawing and the right default. Use hilbert only to
reproduce old output or when tour construction time matters — on 20,000 points
the TSP stage is the slowest part of the run at around 2.5 seconds, while
Hilbert is effectively instantaneous, taking the whole run from 2.9 s to 0.35 s.
The run reports valid=true, confirming the tour visits every point exactly
once and returns to its start.
Subtours
By default the drawing is one closed loop. --groups splits it into several,
which lets you ink them differently.
| Option | Default | Meaning |
|---|---|---|
-k, --groups <N> |
1 | Number of subtours |
--partition <MODE> |
tone |
tone, spatial, or labels |
--mask <PNG> |
— | Region map for --partition labels |
tone— split by darkness, so each subtour carries one tonal band.spatial— split by position.labels— split by a supplied--maskPNG whose flat color regions define the groups. The region count must equal--groups.
ariadne -n 20000 -k 3 --partition tone -w 1.4 \
        --ink "#c1272d,#0e7c7b,#2e4057" cameraman.png
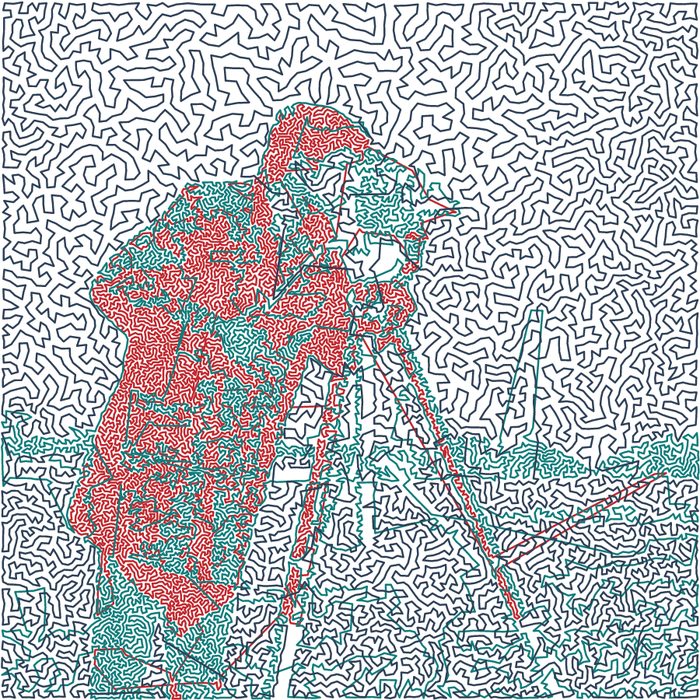
Three tonal bands, three inks: the darkest band is drawn in red, the mid band in teal, the lightest in navy. Because the split is by tone, the colors track the image’s structure rather than cutting across it.
The labels mode is the manual-control path: each region of the mask becomes
its own subtour, which is how you get a specific object drawn in a specific
color. You can paint that mask by hand, or generate one — see
Masking a photograph below.
A mask can be either of two things.
A label image — single-channel, where the pixel value is the region number, as ITK-SNAP and other medical imaging tools write — is read directly: value 0 is group 1, value 1 is group 2, and so on. The display colour is only a display colour. This is the encoding to prefer, because the group order is stated rather than inferred.
An RGB mask is grouped by sorting its distinct colours as (r,g,b) tuples.
That makes the order an accident of the palette: with a red/green/blue palette
the subject painted red comes last, and repainting a region a different
shade silently reorders the inks. tools/to_labels.py converts one to a label
image, numbering regions largest-area first so the background lands at group 1:
a-to_labels masks/m.png masks/m_labels.png
Color
| Option | Default | Meaning |
|---|---|---|
--ink <COLOR[,COLOR...]> |
black |
Ink color, or one per subtour |
--background <COLOR> |
white |
Background color |
Colors are parsed as CSS, so the whole Color Level 4 surface works: named
colors, #rgb / #rrggbb / #rrggbbaa, rgb(), rgba(), hsl(), hwb(),
lab(). Supply one ink per subtour, comma-separated, in group order — commas
inside a functional color are not treated as separators:
ariadne --ink 'rgb(230,234,236), rgba(92,16,24,0.6)' -k 2 ... photo.jpg
green is CSS green — half intensity, #008000. The full-intensity green
an additive triple wants is lime. Both the SVG and the PNG resolve colors
the same way, so the two outputs match; earlier versions wrote the name into the
SVG verbatim and the browser’s CSS interpretation could differ from the PNG.
Alpha works in both outputs. A translucent ink composites over the paper and over whatever has already been drawn, so overlapping subtours blend where they meet rather than the later one simply covering the earlier:
ariadne --ink '#5c101880' ... photo.jpg     # half-strength ink
ariadne --ink 'rgba(92,16,24,0.5)' ... photo.jpg
Measured on one image, dropping alpha walks the drawn pixel from the ink’s own
colour toward the paper: #5c1018 → (92,16,24), cc → (125,64,70),
80 → (173,135,139), 40 → (214,195,197). --background takes alpha too,
though a translucent background over an opaque PNG canvas mostly just lightens
it.
Reproducibility and inspection
--seed <N> (default 42) makes a run repeatable within Rust. It does not
reproduce Julia’s output — the two use different generators. See
Fidelity.
--dry-run reports the resolved configuration and exits:
input       cameraman.png  512x512 px
points      20000
solver      tsp
gamma       2  floor 0
epochs      60  schedule power  polish 2
seed        42  (Rust-only; see --help)
linewidth   0.5  resolution 1200
output      cameraman-ariadne.svg

(dry run — nothing sampled, relaxed, or rendered)
Masking a photograph
ariadne places ink by darkness, so it needs the subject to differ in tone
from what surrounds it. On a photograph where it does not — a figure whose
clothing matches the wall behind them — no combination of --gamma, --floor
or point count recovers the figure. The render comes out an even scribble,
because there is no tonal signal saying where the subject is.
A mask supplies that missing division. The repository ships tools for building
one under DigitalArt/OptArt/tools/:
pip install rembg onnxruntime
./DigitalArt/OptArt/tools/install.sh    # puts the tools on PATH as a-<name>

a-tsp photo.jpeg        # segment and validate, then stop
# check masks/photo_mask_overlay.png — red should cover the subject, nothing else
a-tsp photo.jpeg --go   # render
install.sh symlinks the tools into ~/.cargo/bin beside ariadne and
truchet, so they run from any directory. It also pins each script’s
interpreter to one that actually has the dependencies — #!/usr/bin/env
python3 resolves against PATH at run time, and the first python3 is often
not where pip install rembg landed.
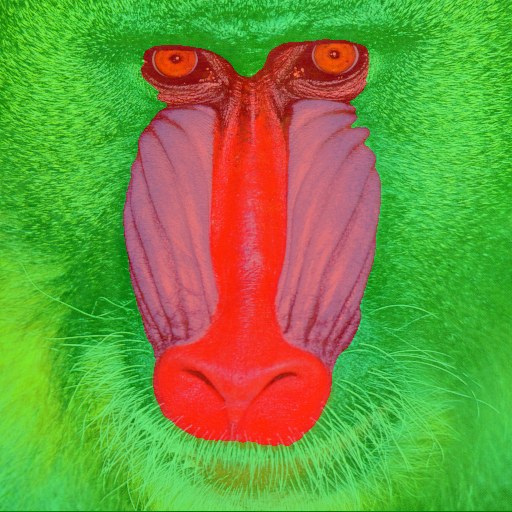
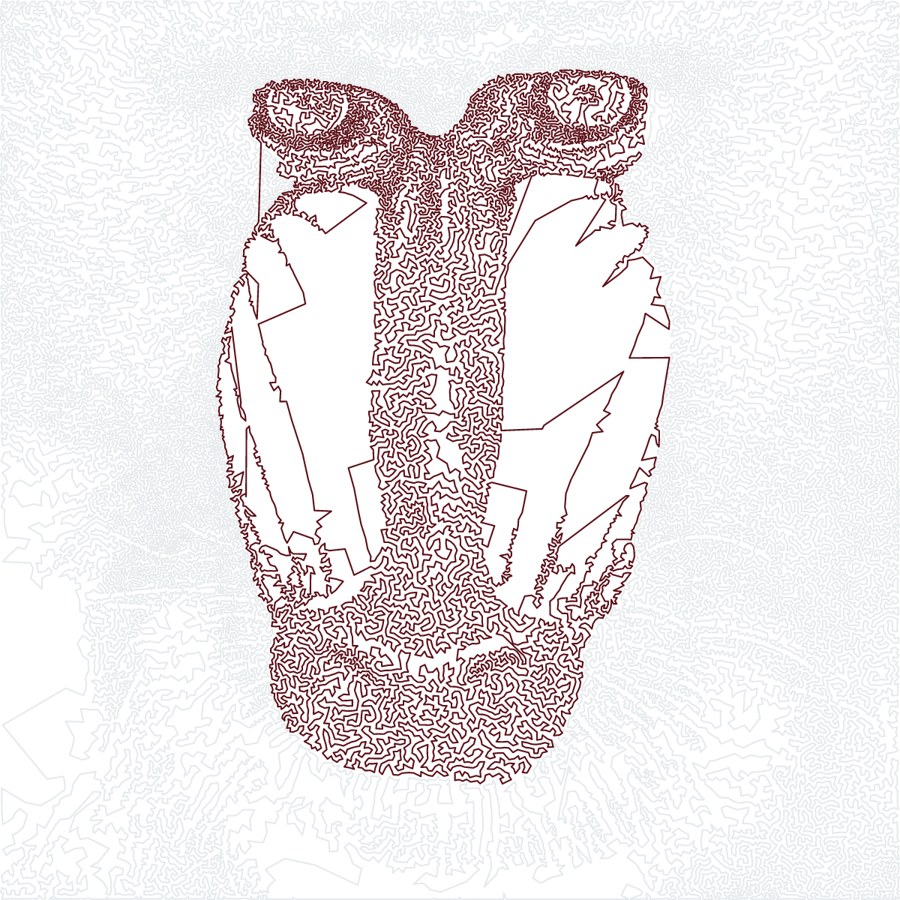
The mask (left) assigns every pixel to a group; the drawing (right) gives each group its own subtour and ink. Two groups here — subject and background — so the background can be dropped to a faint gray while the subject carries the weight.
Two models are available. The default is fast and suits an image whose subject
already stands clear; --hard selects a stronger one for the cases that need
it — a subject sharing tone with its surroundings, deep shadow, or wispy edges.
On an easy image the two agree almost exactly; on a hard one the smaller model
tends to absorb adjacent shadow into the subject, fusing parts that should read
separately.
The mask sets grouping, not density. Which subtour a pixel joins comes from the mask; how much ink it gets still comes from the image. When two things belong in the same group but should read differently — a solid object inside a diffuse one — darken that object in a copy of the photograph and render from the copy, leaving the mask alone.
More than two groups
The model finds one subject and one background, so every further subtour comes from subdividing one of those:
a-tsp photo.jpeg --bands 3 --go        # 4 groups
a-tsp photo.jpeg --split 0.45 --go     # 3 groups
a-tsp photo.jpeg --bands 3 --split 0.45 --go   # 5 groups
--bands N cuts the subject into N tonal bands at quantiles of its own
luminance, each becoming its own subtour with its own ink — the figure gains
internal modelling instead of reading as one flat silhouette. --split FRAC
cuts the background with a horizontal line at FRAC of the height. The
wrapper counts the groups the mask actually has and builds a matching --ink
list: pale backgrounds first, then a dark-to-light ramp across the bands.
Tonal bands leave long chords. A band appears in patches all over the
figure — highlights on a face, a shoulder, a sleeve — and its single closed
tour must travel between them, drawing a straight line each time. More bands
means thinner slices, more fragmentation, and more chords: on one portrait,
three bands gave 14 such crossings and five gave 21. Raising the point count
makes this worse, not better, since finer stippling fragments each band
further. Two or three bands is usually the sweet spot; --split, whose regions
are contiguous, has no such problem.
Colouring the line from the photograph
--ink gives each subtour one flat colour. tools/recolor.py takes the
finished SVG instead and colours every segment from the photograph along that
segment’s own length, so the line becomes a continuous colour field while
remaining the same single non-crossing tour:
ariadne --mask masks/m.png --partition labels --groups 2 --ink '#000,#000' \
        -n 60000 -g 2.2 --floor 0.04 -w 1.6 photo.jpg tour.svg
a-recolor photo.jpg tour.svg out.svg \
        --paper '#0a0c0e' --lift --saturation 2.6
--dominant snaps each segment toward whichever RGB channel leads — pure
primaries where the photograph is saturated, grey where it is neutral — giving
a three-ink separation look from one curve. --dom-gamma 0.6 is bold, 1.4
keeps more detail.
--lift and a dark --paper are what make it work. ariadne puts ink
where the photograph is dark, so a faithful sample paints dark cloth
near-black and leaves the vivid highlights as a few pale lines — on one image
81% of segments came out below saturation 30. Lifting each segment to full
value preserves hue, and a dark ground gives it something to read against.
Point count is colour resolution here, since each segment carries one colour — but lines finer than the raster can resolve average together. The same 180,000-point drawing reads worse than 60,000 at 1400 px wide and better at 2800 px. The SVG is resolution-independent; only raster exports are affected.
Fixing a mask
Three problems put long straight chords in a drawing, and each has a tool.
Strays. Painting over a boundary leaves fragments of the old colour behind. They are invisible — 0.02% of the image — but a tour must visit every point in its group, so a 4-pixel speck 1594 px away drags the line there and back:
a-clean_mask masks/m.png masks/m_clean.png
Islands. A region in several disconnected pieces makes one tour hop between
them. a-split_regions gives each piece its own group, repeating the ink so
the palette is unchanged, and writes a label image:
a-split_regions masks/m_clean.png masks/m_split.png --ink "Ivory,Crimson"
Necks. Two halves of a region joined by a hairline are one group, so a
single tour serves both and crosses the picture. a-check_mask reports them —
on one mask the background narrowed to 3 px at the frame edge, and cutting
it took the longest chord from 2370 px to 1155 px.
Run them in that order: cleaning after splitting leaves the strays merged into their neighbour, and the tour still has to visit them.
To edit a mask by hand, a-edit_mask photo.jpg masks/m.png paints label values
directly over the photograph — no antialiasing to undo afterwards.
Watching the drawing appear
The tour is a sequence, so a film of it being drawn is just progressive prefixes:
a-animate tour.svg tour.mp4 --seconds 25 --width 1080
Animate the monochrome tour, not a recoloured SVG: recolouring replaces the
polylines with one <line> per segment and the drawing order is lost.
See DigitalArt/OptArt/tools/README.md for the palette, the antialiasing
requirement, and hand-editing.
Performance
On the 512×512 cameraman image, Apple Silicon:
| Points | Solver | Total | of which the tour |
|---|---|---|---|
| 20,000 | tsp |
0.5 s | 0.13 s |
| 60,000 | tsp |
1.8 s | 0.95 s |
| 60,000 | tsp, -k 4 |
1.1 s | 0.16 s |
| 20,000 | hilbert |
0.3 s | — |
Rendering is essentially free (0.02–0.06 s). In the Julia implementation the same drawing takes 10.3 seconds, 9.5 of it inside Makie’s SVG writer.
Point count costs roughly quadratic time, and the cost is per subtour.
Splitting the work with --groups therefore buys speed as well as color: the
60,000-point row above is 6× faster across four subtours than as one, because
each tour carries a quarter of the points and the four are solved in parallel.
If you want to iterate on composition before committing to a slow render,
--solver hilbert is near-instant at any point count. Its tours are about 23%
longer and less elegant, but the picture’s density and framing read the same.
Troubleshooting
The drawing is a mesh and the subject never appears. Point count is too low.
Raise -n toward 20,000 or beyond.
The lines are pale and washed out. -w is too small for your -r. Scale
line width with resolution.
Light areas are full of wandering line. Set --floor to a small positive
value so near-white becomes exactly white.
The output differs from Julia’s for the same seed. Expected for the random stages. See Fidelity.